
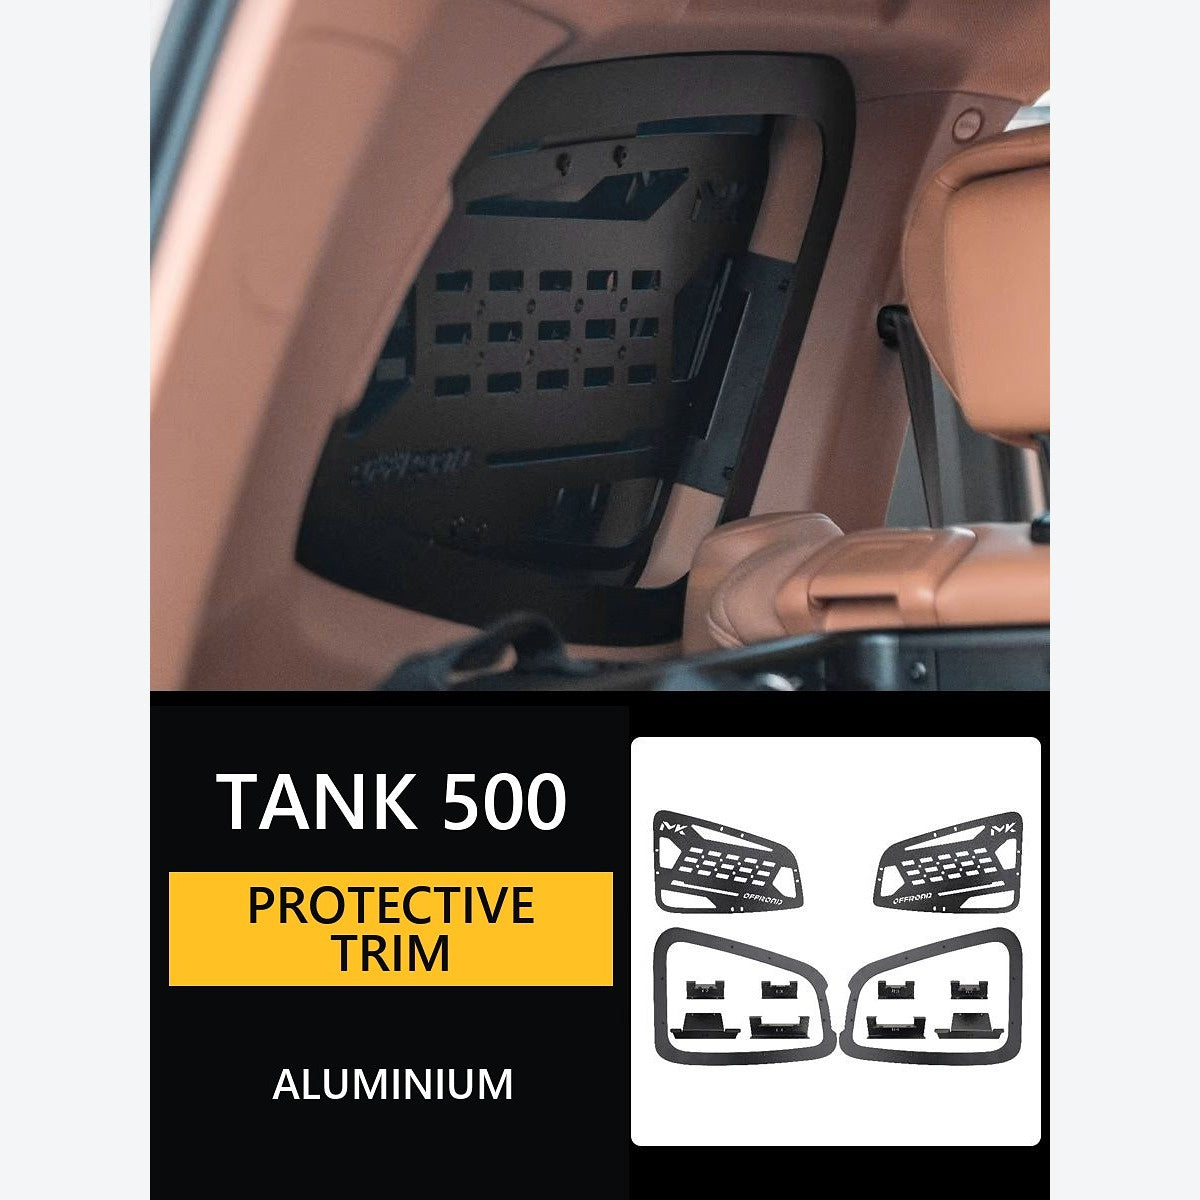
A TANK 500 side-window storage frame uses the cargo-area window surrounds as an organisation zone; it is not a substitute for a boot floor system or a certified heavy-load barrier. Our left-and-right TANK 500 cargo side-window frame listing describes an aluminium-alloy kit for both sides of the rear cargo area. The gallery shows panels beside the rear side glass and a small bag attached to one panel.
That is enough to understand the intended use, but not enough to assume that every TANK 500 variant has identical mounting points or that the kit has a stated load rating. Before ordering, compare the exact window shape and fixing locations with your vehicle, and ask how the supplied pieces mount.
Catalogue checked: 25 September 2026. This article uses our current product listing and gallery, not an independent installation or load test. Gallery phrases such as “no-drill installation” and “scratch, wear & corrosion resistant” are catalogue claims; the listing does not provide a tested rating, installation manual or year-by-year compatibility chart. Images are examples, not proof of fitment.
What this accessory is—and what it is not
The gallery presents a perforated panel inside each rear side-window area. The product description calls these left- and right-side aluminium storage frames and says they provide mounting and organisation space for travel essentials. That is a different job from a cargo mat, floor drawer, barrier or roof rack.
| Your storage problem | Is a side-window frame the obvious answer? | What to check instead or alongside it |
|---|---|---|
| Small items become hard to find in the boot | Potentially, if the items and attachments suit the panel | Bag size, attachment method and available space |
| Heavy equipment moves during braking | Not on the listing evidence alone | Proper cargo restraint and the vehicle's approved anchor points |
| The cargo floor needs protection | No | A fitted mat or liner |
| You need more floor space for bulky gear | Possibly, but only for suitable light items | Whether the mounted items obstruct seats, glazing or cargo access |
| You want a rigid occupant barrier | No | A separately specified, correctly installed cargo barrier |
A tidy photograph can show the layout, but it cannot establish restraint performance. Keep heavy and hard objects secured using appropriate vehicle-approved load points rather than relying on an unverified accessory panel.

Start the fitment check with the vehicle, not the model badge
The listing expressly asks buyers to compare the side-window shape and mounting points shown in the gallery with their own vehicle. Treat that as a required step. “TANK 500” on both the listing and the tailgate is not a complete compatibility check, especially if your vehicle has different trim, a different build date or an accessory already occupying the window surround.
Take four useful photos before asking for confirmation:
- A wide view of the left cargo-area window and trim.
- The equivalent right-side view.
- Close-ups of the upper and lower positions where a frame would be secured.
- A view with the rear seats in the positions you actually use.
Also provide the model year, build month, Australian grade and powertrain. If you have aftermarket trim, a cargo barrier, a drawer system or existing electrical equipment nearby, mention it. Request a supplier response identifying your mounting locations, the supplied hardware and whether any existing trim must be removed or altered.
Our TANK 500 diesel accessory fitment checklist explains the broader principle: a new powertrain badge is not proof that an interior accessory is interchangeable. The same caution applies to HEV, PHEV and diesel vehicles unless the actual installation points are confirmed.

Ask what is included and how it mounts
The product text says the purchase is a pair for both sides, but its short description does not enumerate each bracket, fastener or backing piece. The component illustration appears to show more than two individual shapes. Confirm the exact pack contents rather than translating “left and right” into an assumed piece count.
One gallery tile advertises “no-drill installation” and “secure, direct fit”. Those words are useful questions for the seller, not a reason to begin dismantling trim. Ask for the actual fitting instructions for the current kit and your exact vehicle. In particular:
- Which original fixing points, if any, are reused?
- Are brackets, bolts, spacers and protective pads supplied?
- Does installation require removing trim, and is any drilling, adhesive or permanent modification involved?
- Can the installer show the final clearance around interior trim, the rear seats and the cargo opening?
- What is the specified working-load limit, if any, for the panel and for individual attachment points?
Do not treat “aluminium alloy” as a load rating. Alloy grade, panel thickness, bracket design and how forces enter the vehicle all matter. If the seller cannot provide a rating, plan for modest organisation only and do not use the panel as a safety restraint or lifting point.

Plan the cargo layout before attaching anything
Start with the item you actually want to carry. A soft pouch for small trip essentials poses a different question from a heavy tool, recovery item or rigid container. Determine the item mass, the mounting method and whether it can remain secure when the vehicle changes direction or stops abruptly. The panel listing does not provide enough information to recommend a particular maximum mass.
Make sure the fitted frame and anything attached to it do not interfere with the rear seats, their travel or folding motion; access to original cargo anchor points; opening and closing the tailgate; or the driver's useful view through the glass. Do not obscure or modify vehicle safety equipment. If the attachment zone is near a seat belt, airbag deployment path or electrical trim, seek vehicle-specific installation advice rather than guessing from a catalogue photograph.
A practical dry run is to place your usual luggage in the boot and then mark where the proposed panel and bag would sit. If a feature you use regularly would become inaccessible, solve the layout before buying the accessory. Good storage is about reachable, retained items, not simply filling every available panel.
Quick answers before ordering
Does the kit include both sides?
The current listing describes a left-and-right pair. Confirm the current carton contents and hardware with the seller because the short description does not list every individual component.
Is it definitely no-drill?
The gallery advertises no-drill installation, but the text listing does not provide installation steps or a vehicle-by-vehicle fitting guide. Ask for the current instructions and have the supplier identify the fixing points on your exact vehicle.
How much weight can I hang from it?
No tested working-load limit is stated in the current listing. Do not infer one from the aluminium description, perforations or a photo of a bag. Ask for a written rating for the complete installed system; use suitable vehicle load anchors for heavier equipment.
Will it fit my diesel, hybrid or PHEV TANK 500?
The listing names the TANK 500 but does not publish a grade-and-powertrain fitment matrix. Compare both cargo-window shapes and mounting points, then request specific confirmation for your build.
Bottom line: this kit may be a neat way to organise suitable small cargo at the side windows, provided the real mounting points match and the intended items have an appropriate attachment method. Send the supplier your vehicle details and both window photos before ordering. See the current TANK 500 side-window frame product page for the gallery and available option.